2. Setting up the Backstage Catalog
The Backstage Software Catalog is the heart of your developer portal. It provides a centralized view of all software components, services, APIs, resources, and teams in your organization. It is one of the Core Features that is included by default.
In this chapter, you’ll learn how to populate and manage the catalog effectively.
Understanding the Catalog
The catalog uses YAML files to describe entities. Each entity represents something in your software ecosystem.
These are the basic entities:
- Components: Individual pieces of software (services, libraries, websites)
- APIs: Interfaces that components provide
- Resources: Infrastructure resources (databases, queues, storage)
- Systems: Collections of components and resources
- Domains: Groups of related systems
- Groups: Teams or organizational units
- Users: Individual people
Note
The catalog uses a declarative approach - you describe what exists, and Backstage takes care of displaying and organizing it.This is the Backstage entity model:

Task 2.1: Create Your First Component
In this chapter, you’ll create a simple microservice component and register it in the catalog.
Create the entity description file
It is common to put the component description files alongside to the app source code and name it catalog-info.yaml.
For our techlab we put it inside the examples directory.
Create a new directory named my-sample-service inside the examples directory of your Backstage App:
mkdir -p examples/my-sample-service
Create a catalog-info.yaml file with the following content inside your newly created directory:
apiVersion: backstage.io/v1alpha1
kind: Component
metadata:
  name: my-sample-service #(1)
  description: A sample microservice for the Backstage catalog #(2)
  annotations: #(3)
    github.com/project-slug: your-org/my-sample-service
  tags: #(4)
    - nodejs
    - microservice
  links:
    - url: https://dashboard.example.com
      title: Service Dashboard
      icon: dashboard
spec:
  type: service #(5)
  lifecycle: production #(6)
  owner: team-a #(7)
  system: my-system #(8)
Understanding the structure:
metadata.name: Unique identifier for the componentmetadata.description: Human-readable descriptionmetadata.annotations: Additional metadata (like GitHub repository)metadata.tags: Labels for filtering and searchingspec.type: Type of component (service, library, website, etc.)spec.lifecycle: Stage of development (experimental, production, deprecated)spec.owner: Team or group that owns this componentspec.system: System this component belongs to
See the Backstage Descriptor Format for more details.
Manual registration in the catalog
Catalog entries can be registered static or through Entity Providers .
We use the static registration pointing to our entity description file.
Add the new entity to the catalog-location in your app-config.yaml:
catalog:
  locations:
  ...
    - type: file
      target: ../../examples/my-sample-service/catalog-info.yaml
      rules:
        - allow: [Component]
Backstage will automatically pick up the new component. If your Backstage app is not running, start it again.
Important
With the local setup, the catalog locations are sometimes not picked up automatically. In this case, you need to restart the Backstage application for the changes to take effect. After a restart, wait a minute until the catalog-registration is finished.Navigate to your Backstage catalog, click on the name of your newly created component and explore the values of your component. (There are some info-messages about unresolved relations, that you can ignore at this moment.)
Explore the different tabs:
- Overview: Basic information
- Techdocs: Technical documentation for this component
- API: APIs provided by this component
Checkout the entity detail by selecting Inspect entity in the submenu in the top right corner.
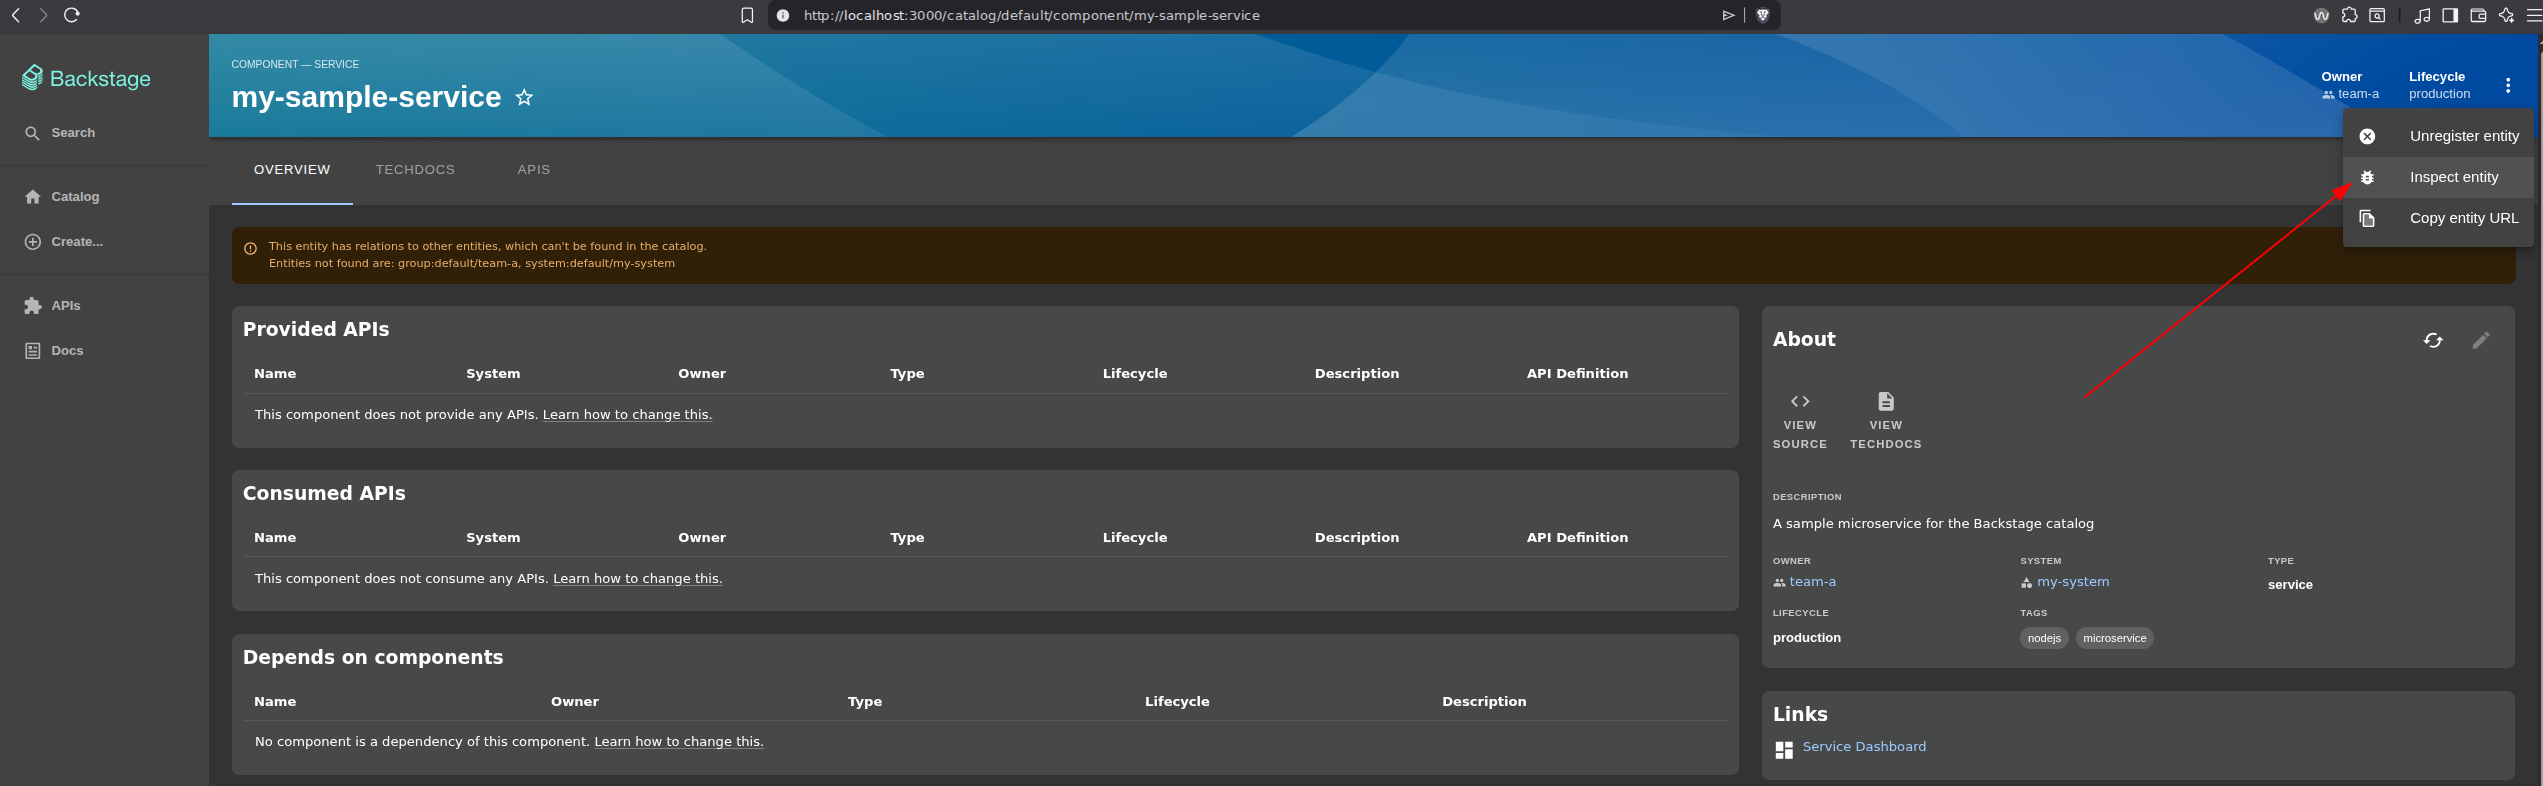
In the modal you can analyze all the details of the entity. This is specially helpful if you need to see the Raw JSON/Raw YAML.
Do you see the added configuration?
Backstage adds additional information to the entity that makes it unique and marks it’s origin. Also matched relations are added.
Task 2.2: Create a Complete System
Let’s create a more complex example with multiple components forming a system.
We can put more than one entity inside the same yaml file when they are separated by ---.
Create a new directory named my-entities inside the examples directory of your Backstage App:
mkdir -p examples/my-entities
Create a new file catalog-info.yaml and save it to your examples/my-entities directory:
---
apiVersion: backstage.io/v1alpha1
kind: System
metadata:
  name: my-system
  description: An e-commerce platform system
  tags:
    - ecommerce
spec:
  owner: team-a
  domain: retail
---
apiVersion: backstage.io/v1alpha1
kind: Component
metadata:
  name: frontend-app
  description: Customer-facing web application
  tags:
    - react
    - frontend
spec:
  type: website
  lifecycle: production
  owner: team-a
  system: my-system
  providesApis:
    - user-api
---
apiVersion: backstage.io/v1alpha1
kind: Component
metadata:
  name: backend-service
  description: Backend REST API service
  tags:
    - nodejs
    - api
spec:
  type: service
  lifecycle: production
  owner: team-a
  system: my-system
  providesApis:
    - user-api
    - order-api
  consumesApis:
    - payment-api
---
apiVersion: backstage.io/v1alpha1
kind: API
metadata:
  name: user-api
  description: User management API
spec:
  type: openapi
  lifecycle: production
  owner: team-a
  system: my-system
  definition: |
    openapi: 3.0.0
    info:
      title: User API
      version: 1.0.0
    paths:
      /users:
        get:
          summary: List all users
          responses:
            '200':
              description: Successful response
---
apiVersion: backstage.io/v1alpha1
kind: Resource
metadata:
  name: user-database
  description: PostgreSQL database for user data
spec:
  type: database
  lifecycle: production
  owner: team-a
  system: my-system
Note
Notice how components reference each other throughprovidesApis and consumesApis. This creates a dependency graph that Backstage visualizes automatically.Register the Entity in the Catalog
Add the new entity to the catalog-location in your app-config.yaml:
catalog:
  locations:
  ...
    - type: file
      target: ../../examples/my-entities/catalog-info.yaml
      rules:
        - allow: [System, Component, API, Resource]
Note
Theallow list had to be extended that Backstage imports all entities of the file.Backstage will automatically pick up the new entities.
Checkout the new entities. You can navigate between them by clicking on relations.
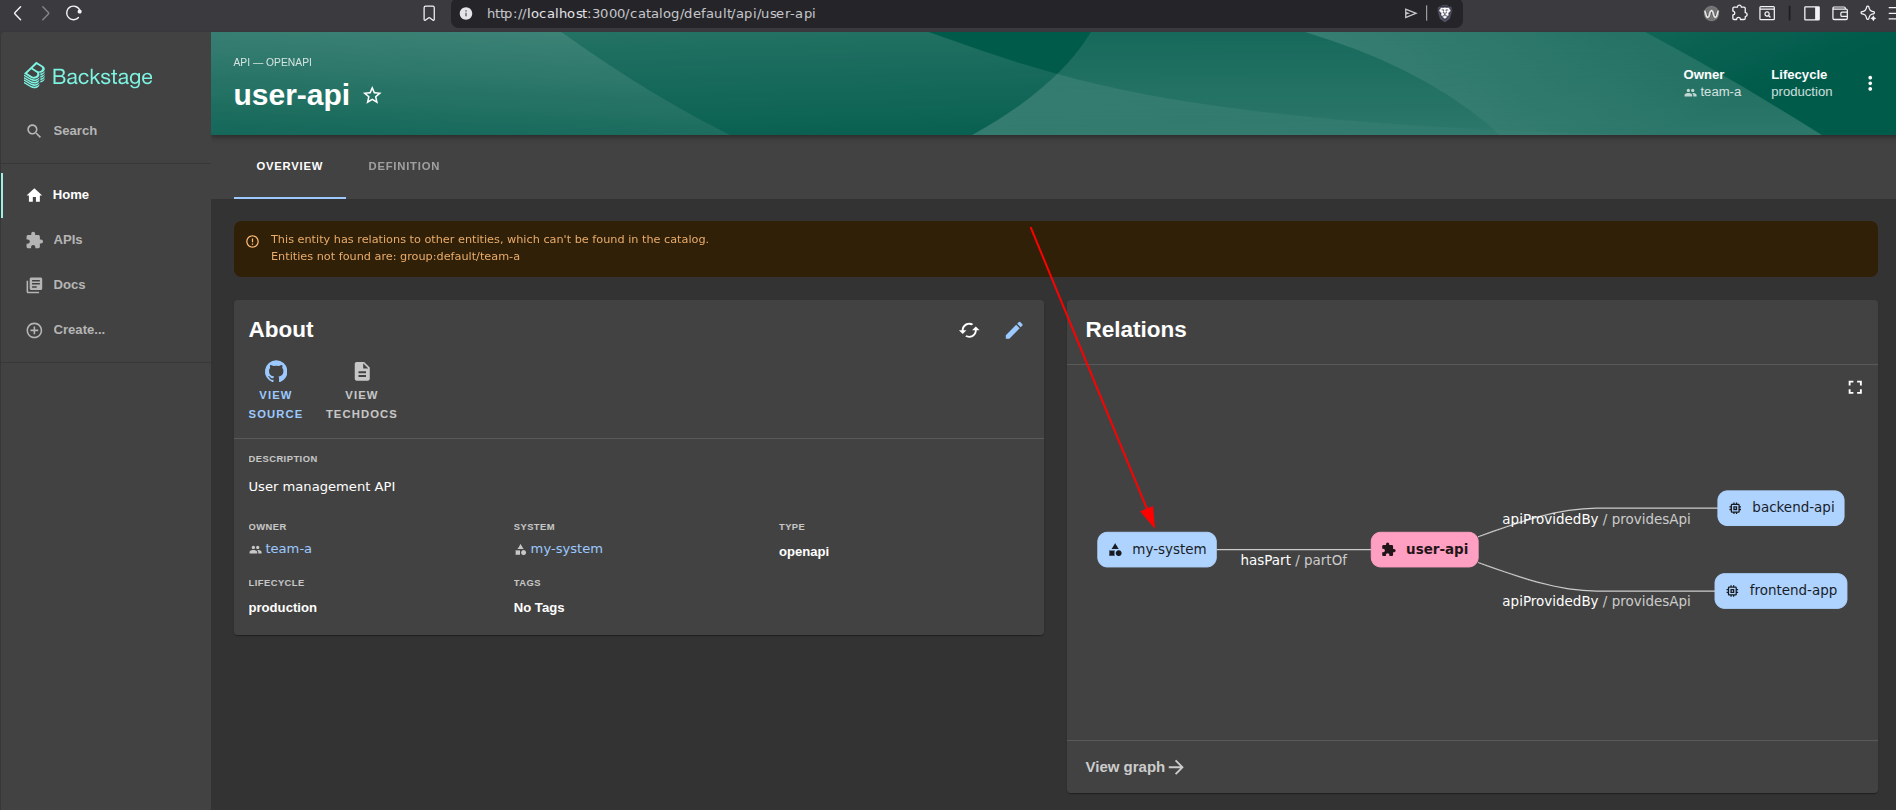
Interesting might be the API where you can browse the OpenAPI spec.
Task 2.3: Define Teams and Ownership
Ownership is crucial for accountability. Let’s define teams in the catalog.
Create a catalog-org.yaml file in the examples folder:
---
apiVersion: backstage.io/v1alpha1
kind: Group
metadata:
  name: team-a
  description: Platform Engineering Team
spec:
  type: team
  profile:
    displayName: Platform Engineering
    email: platform@example.com
  children: []
  members:
    - john.doe
    - jane.smith
---
apiVersion: backstage.io/v1alpha1
kind: User
metadata:
  name: john.doe
  description: Senior Platform Engineer
spec:
  profile:
    displayName: John Doe
    email: john.doe@example.com
  memberOf:
    - team-a
---
apiVersion: backstage.io/v1alpha1
kind: User
metadata:
  name: jane.smith
  description: Platform Engineer
spec:
  profile:
    displayName: Jane Smith
    email: jane.smith@example.com
  memberOf:
    - team-a
Note
The name of the file does not have to becatalog-info.yaml when it is imported static.Register this in your app-config.yaml:
catalog:
  locations:
    - type: file
      target: ../../examples/catalog-org.yaml
      rules:
        - allow: [User, Group]
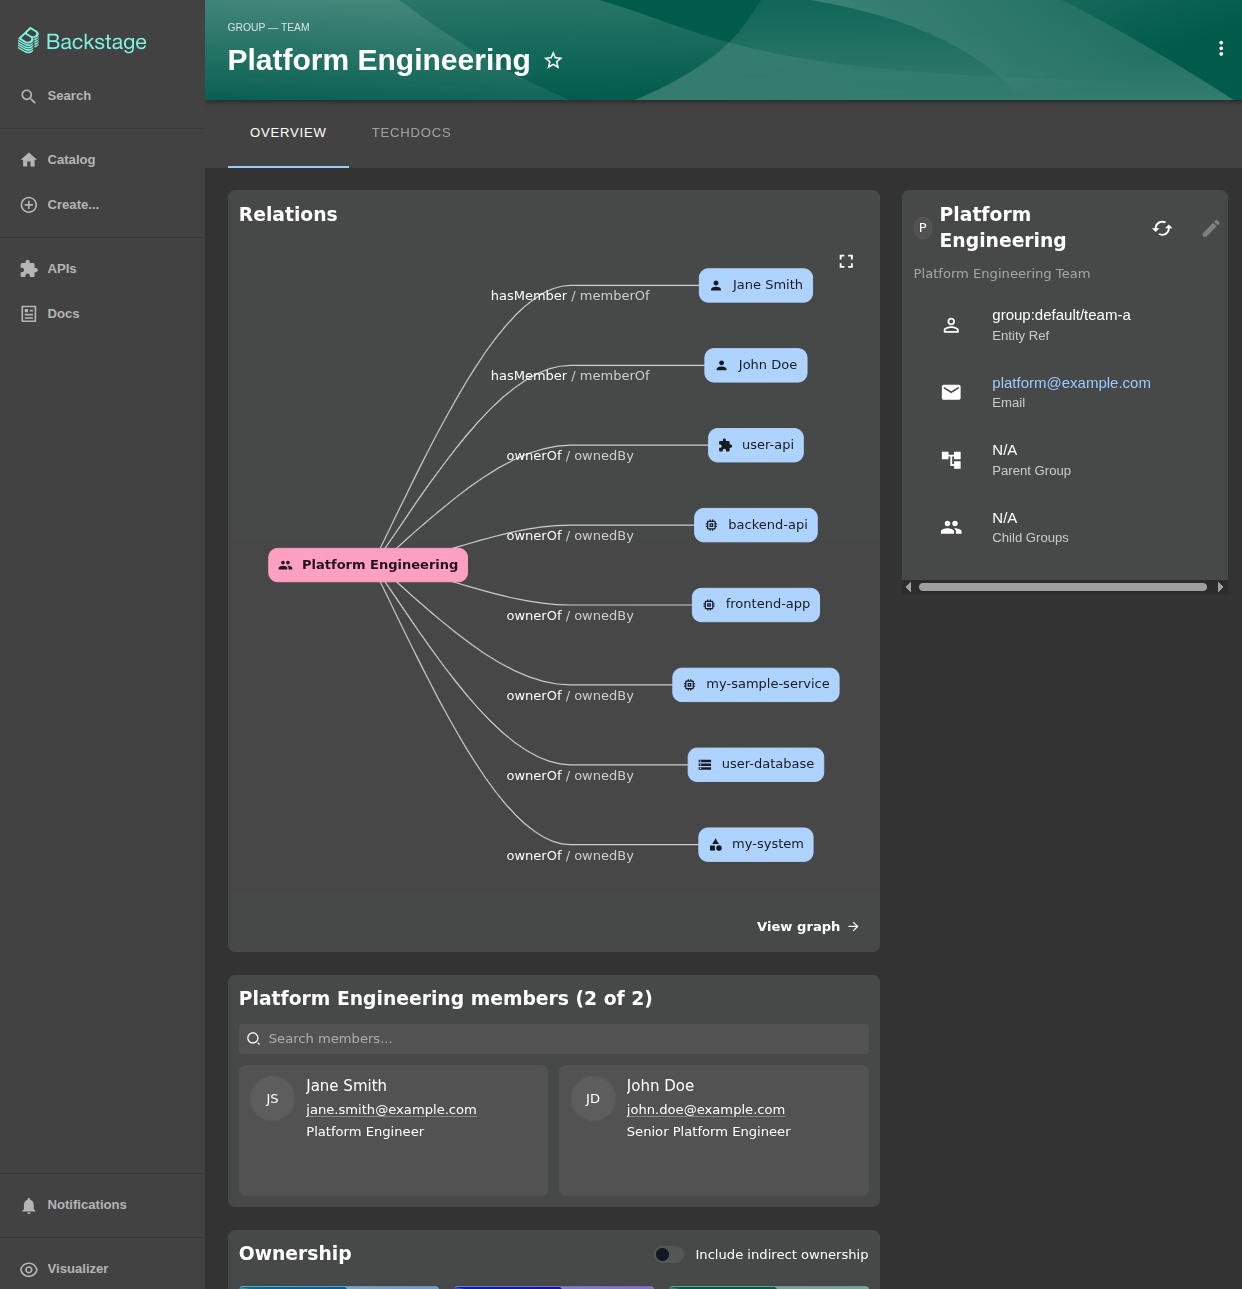
Select the Group Kind inside your Catalog and click on your just created Platform Engineering group.
Now looking at your entities, you can click on a owner and you’ll see the actual team members who own them! Check out the connection between all the entities by clicking on the relations or links.
Best Practices for Catalog Management
As you build out your catalog, keep these best practices in mind:
- Keep catalog files with the code: Store
catalog-info.yamlin the same repository as the component - Use consistent naming: Follow a naming convention (e.g., kebab-case)
- Tag appropriately: Use tags for technology, team, and purpose
- Define clear ownership: Every component should have an owner
- Document relationships: Use
dependsOn,providesApis, andconsumesApis - Keep it up to date: Automate catalog updates through CI/CD
- Use systems and domains: Group related components for better organization
Summary
In this chapter, you:
- ✅ Created and registered your first catalog component
- ✅ Built a complete system with multiple entities
- ✅ Defined teams and ownership
Your Backstage catalog is now populated with data that represents your software ecosystem!